Cloud Platform Operation Manual

Xingzhen Technology, your best intelligent upgrade partner
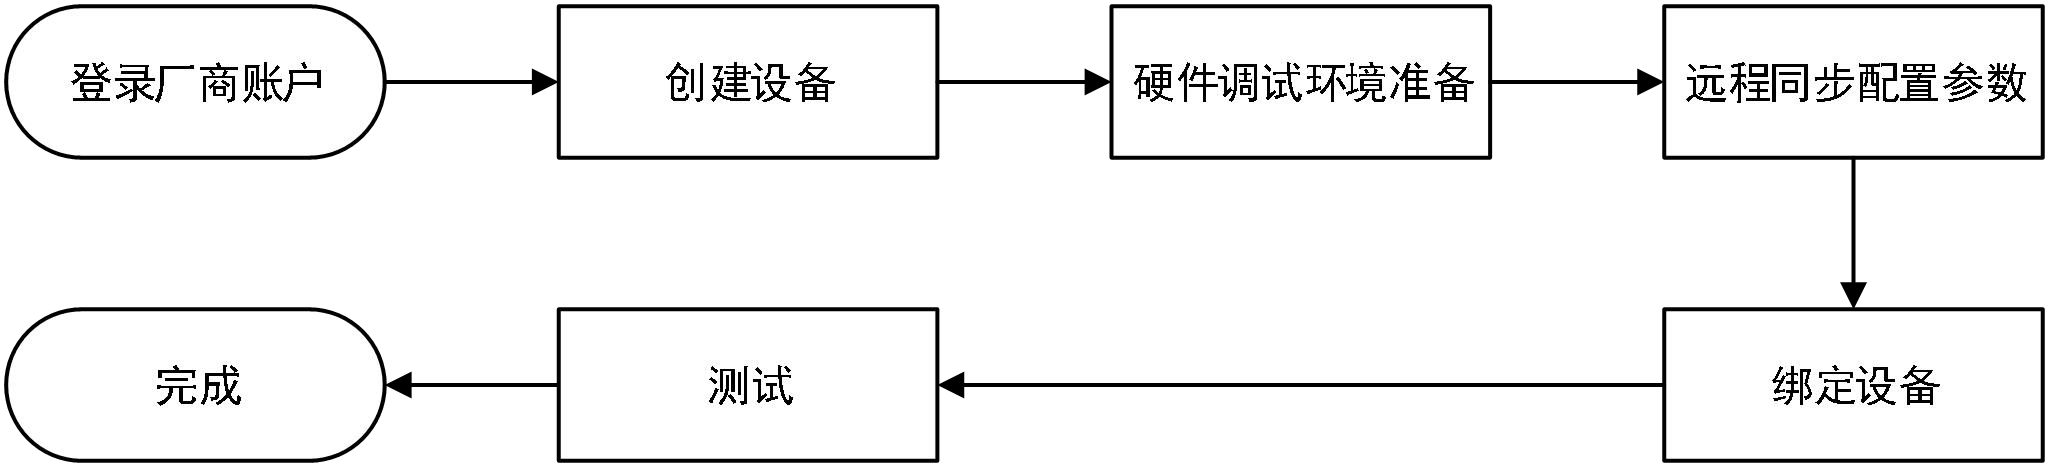
1. Create Device Based on Existing Product
If based on an existing product, creating a device will be very simple and fast, the process is as shown in the figure below:
2. Create New Product
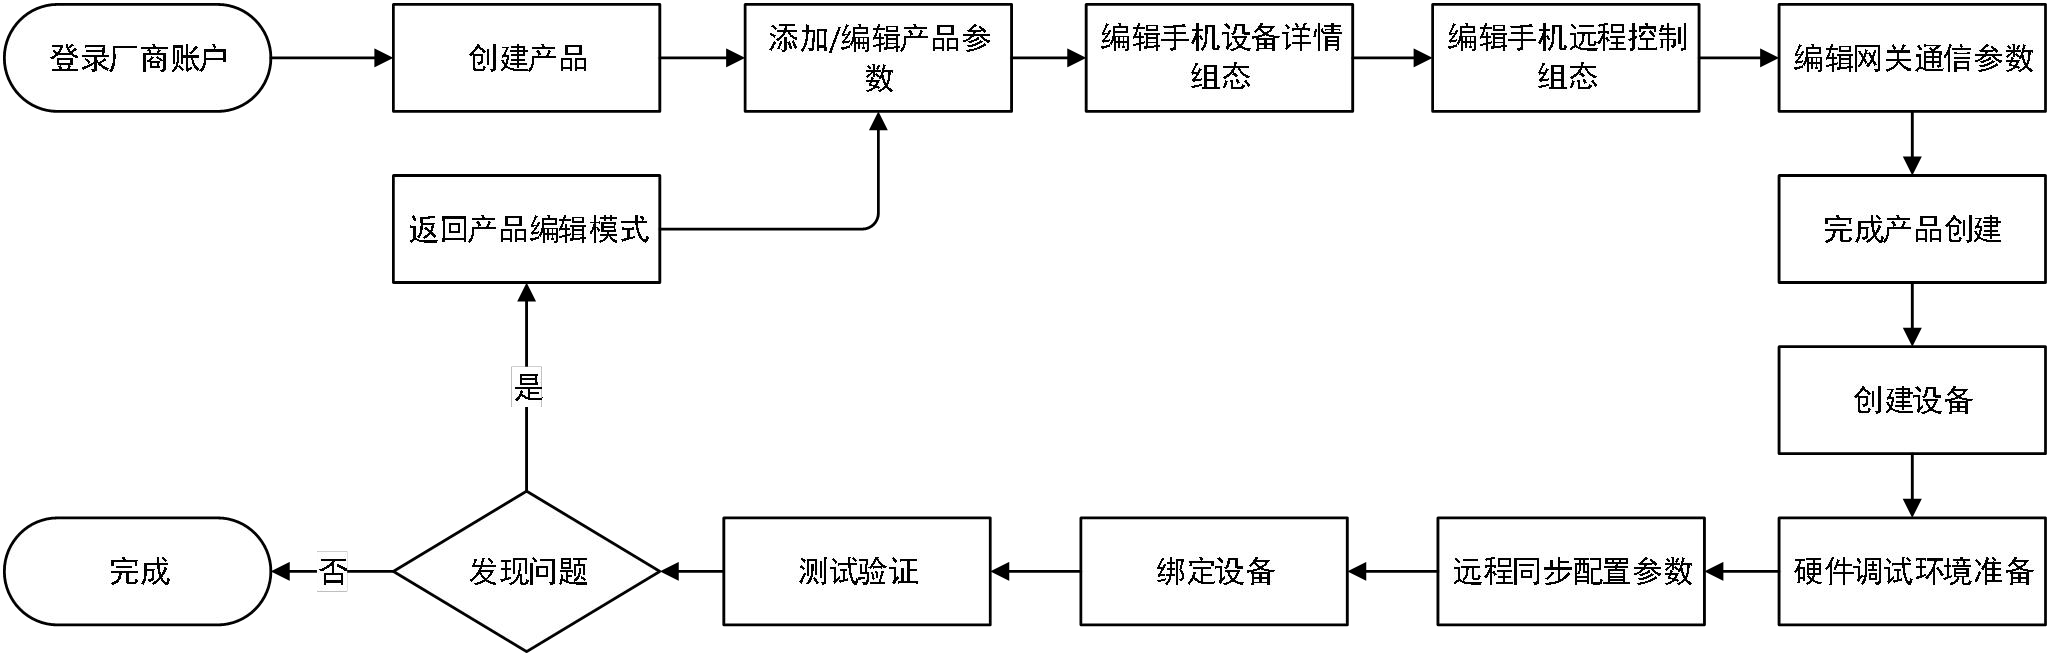
Create new product process
The following uses a simple device as an example to illustrate the process of creating a device: Modbus parameters
| No. | Parameter Name | Address Type | Address | Description |
|---|---|---|---|---|
| 1 | Cooling Outlet Temperature | 3x | 1 | 0.1℃ (resolution) |
Product ID: XZ-TEST01
Product Name: Test Sample
Device ID: HY202BF0DE17F
Device Name: Sample Device
2.1 Create Product
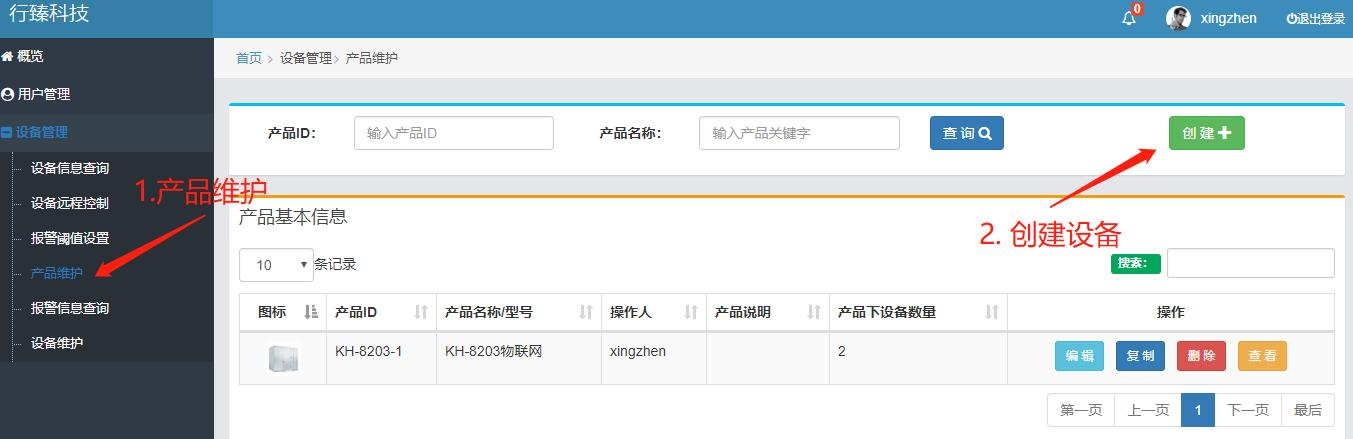
Step 1: Create product

Step 2: Edit product information

Step 3: Enter product editing interface
2.2 Add Product Parameters
Note: You can also import parameters in batches through excel table, refer to 2.13 Batch Import Parameters
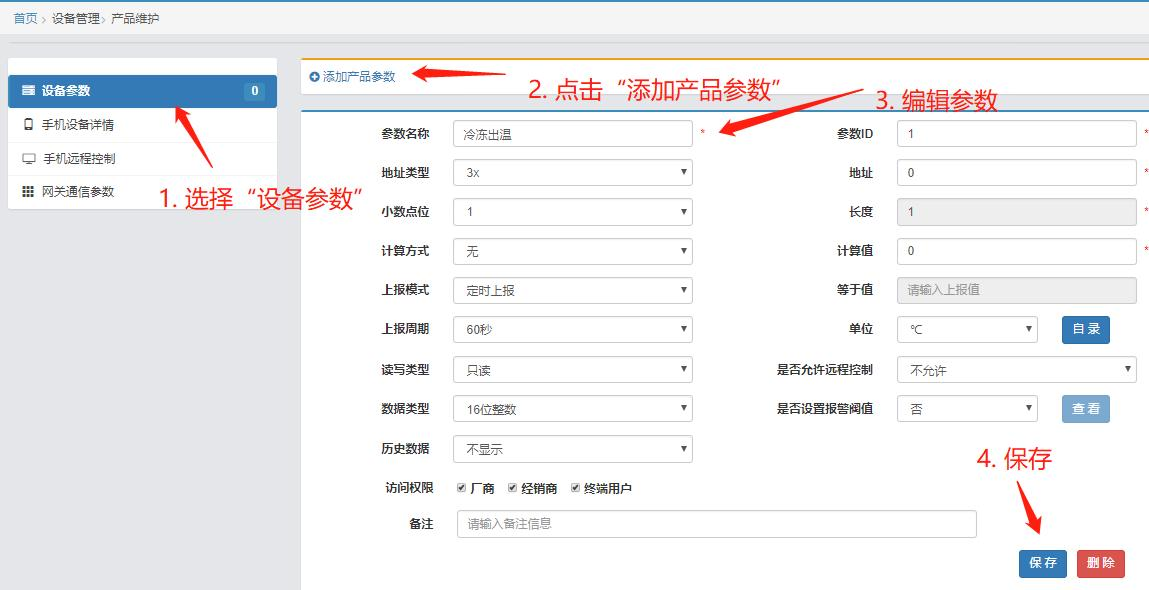
Step 1: Add product parameters according to the above figure
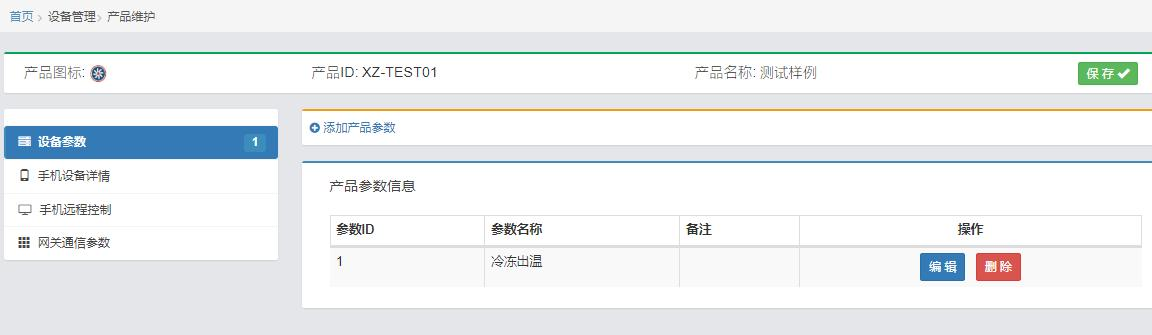
Step 2: Complete adding product parameters
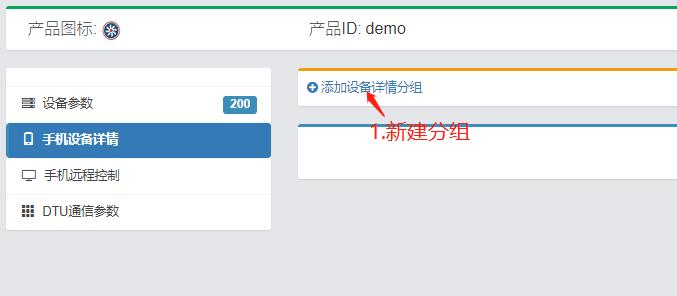
2.3 Edit Mobile Device Details Configuration
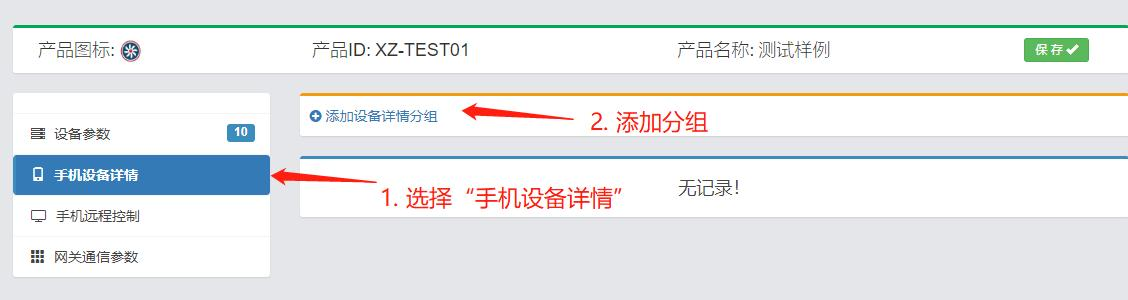
Step 1: Create new group
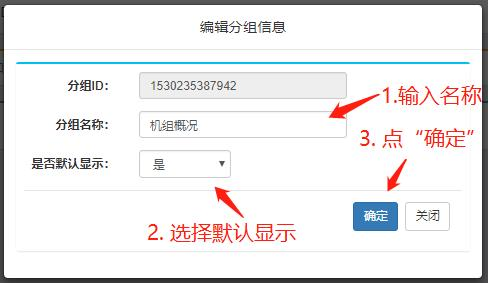
Step 2: Configure group information
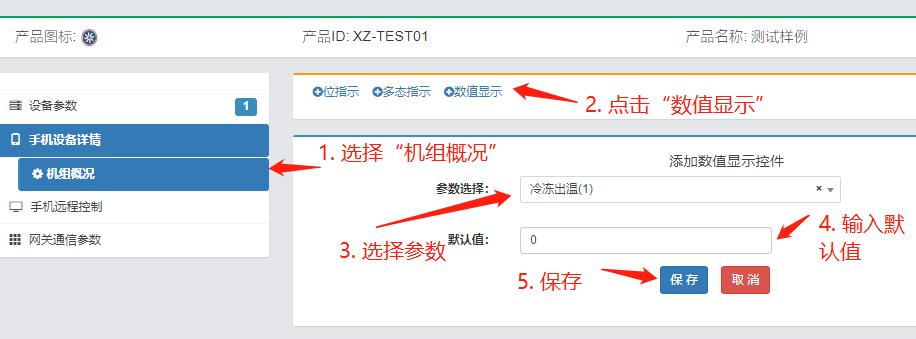
Step 3: Configure display controls
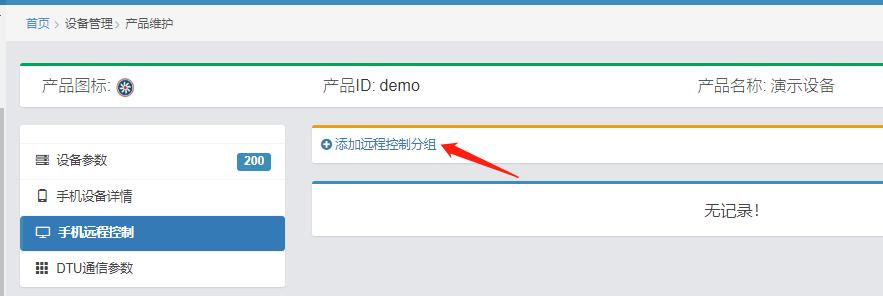
2.4 Edit Mobile Remote Control
This example has no remote control parameters. For details, please refer to 5. Configuration Controls chapter.
2.5 Edit Gateway Communication Parameters
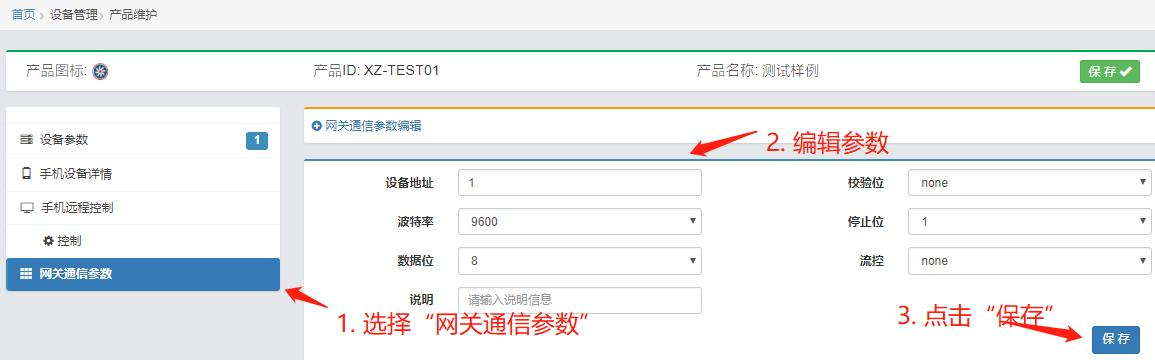
Edit and save communication parameters
2.6 Complete Product Creation
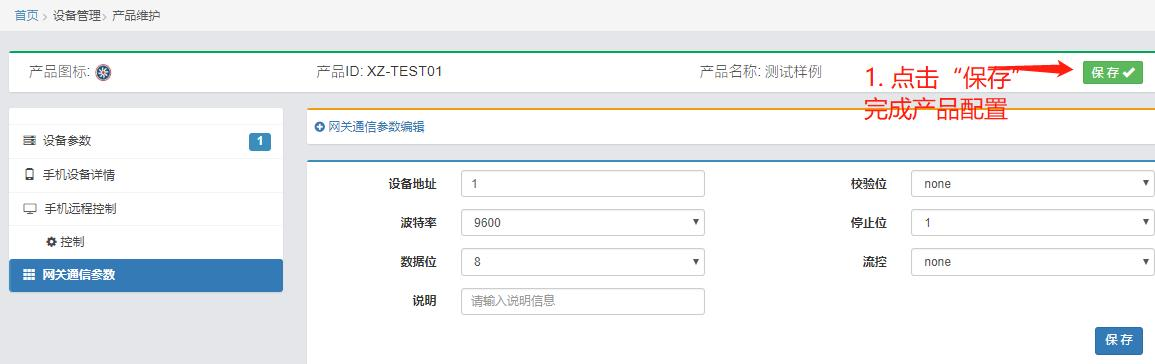
Save configuration, complete product creation
2.7 Create Device
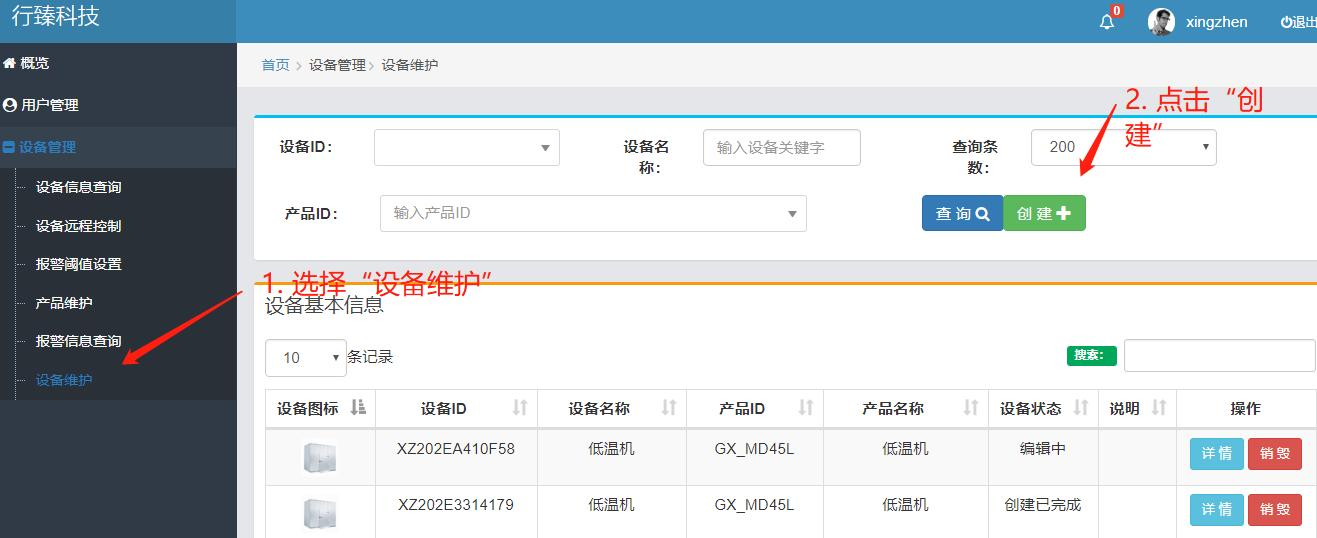
Step 1: Create device
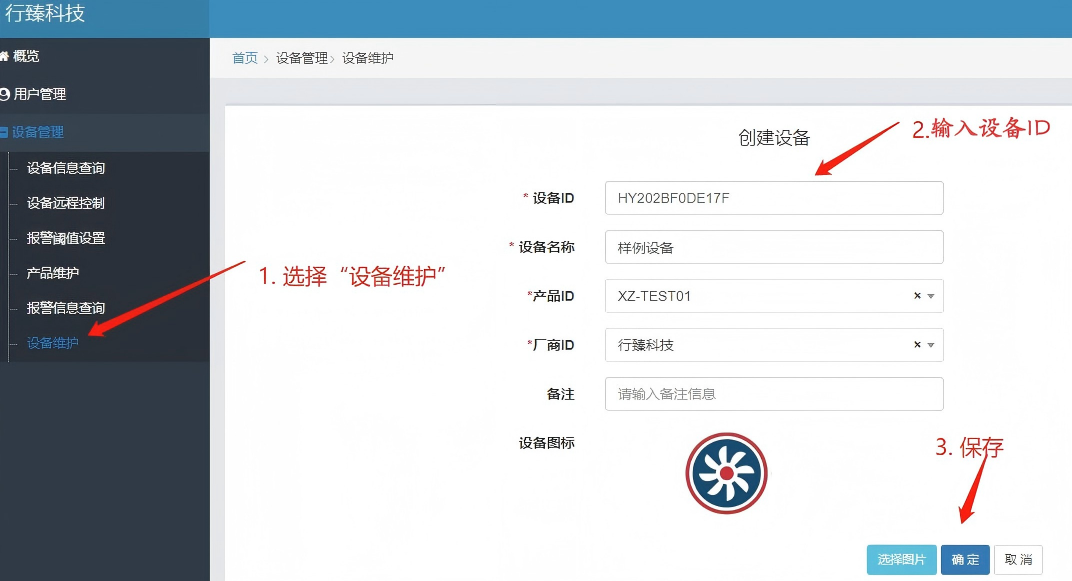
Step 2: Edit device information

Step 3: Click "Complete" to finish device creation
2.8 Hardware Debugging Environment Preparation
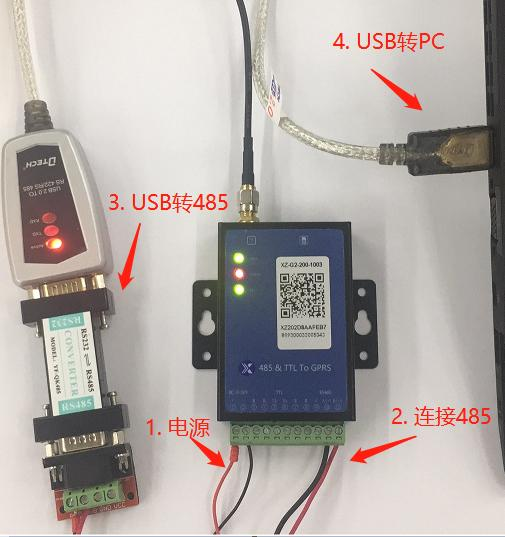
Step 1: Connect DTU to PC, power on DTU
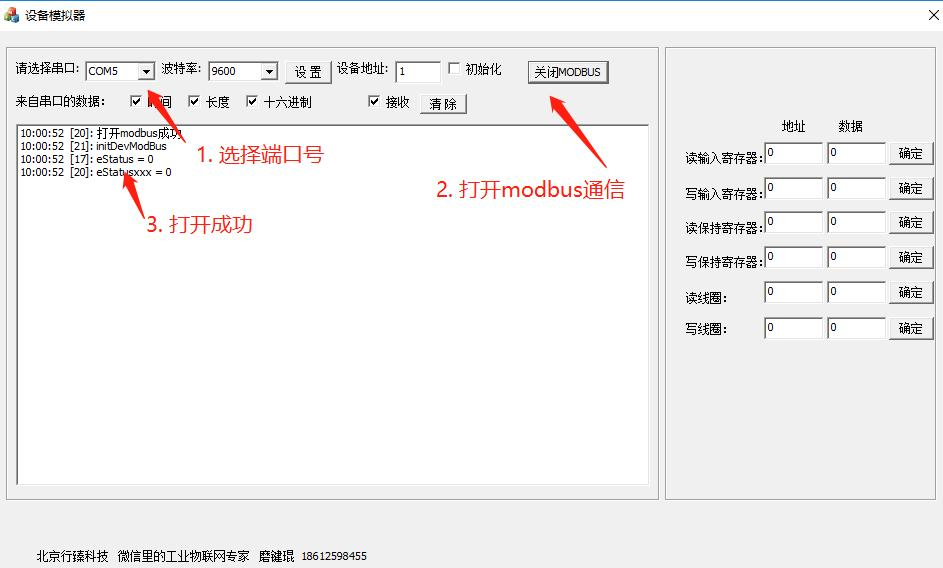
Step 2: Device simulator establishes communication with DTU
2.9 Remote Sync Configuration Parameters
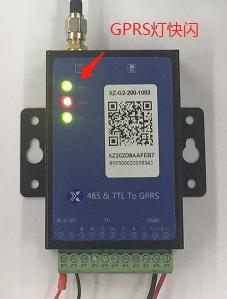
Step 1: Confirm DTU communication is normal (GPRS light flashes quickly)
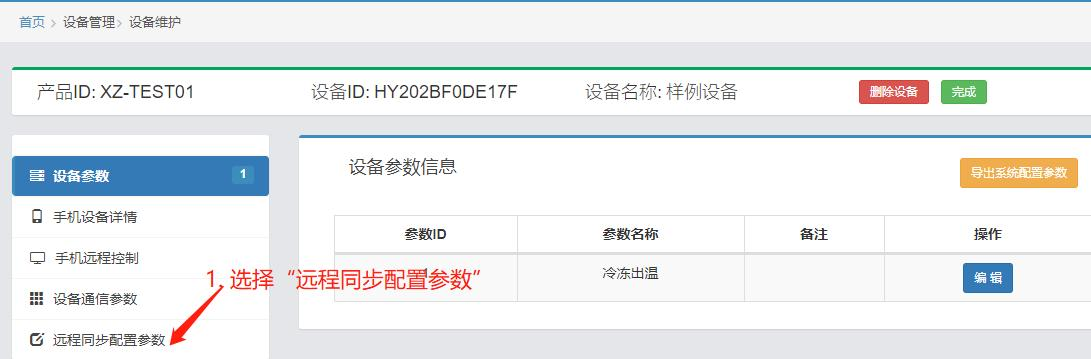
Step 2: Select "Remote sync configuration parameters"
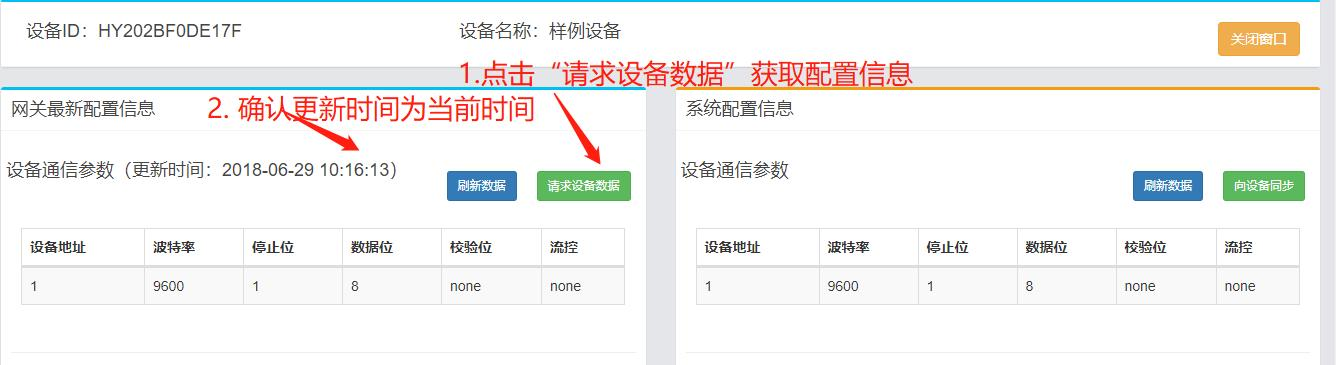
Step 3: Confirm to get communication parameters to confirm communication is normal
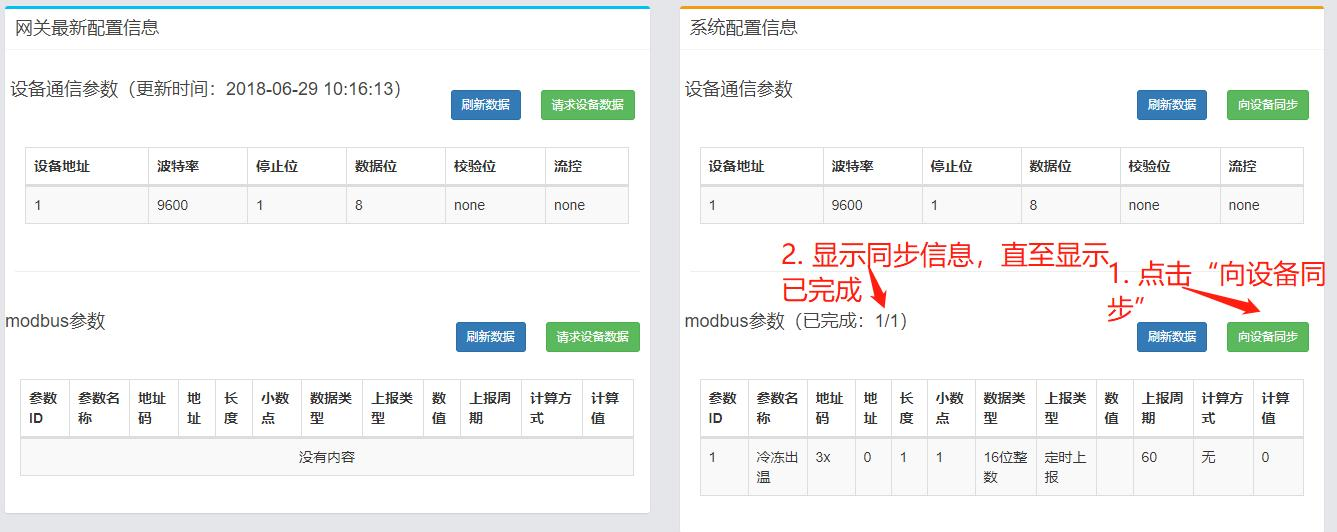
Step 4: Sync modbus parameters to device
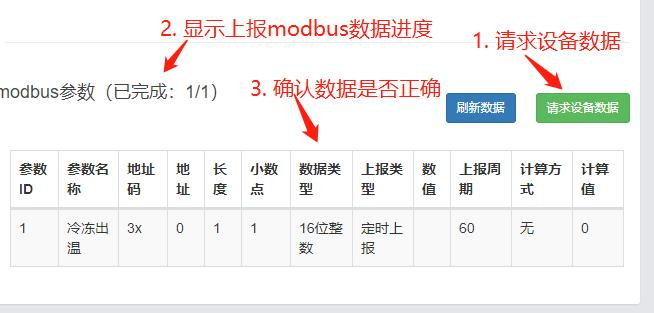
Step 5: Confirm modbus data is correct
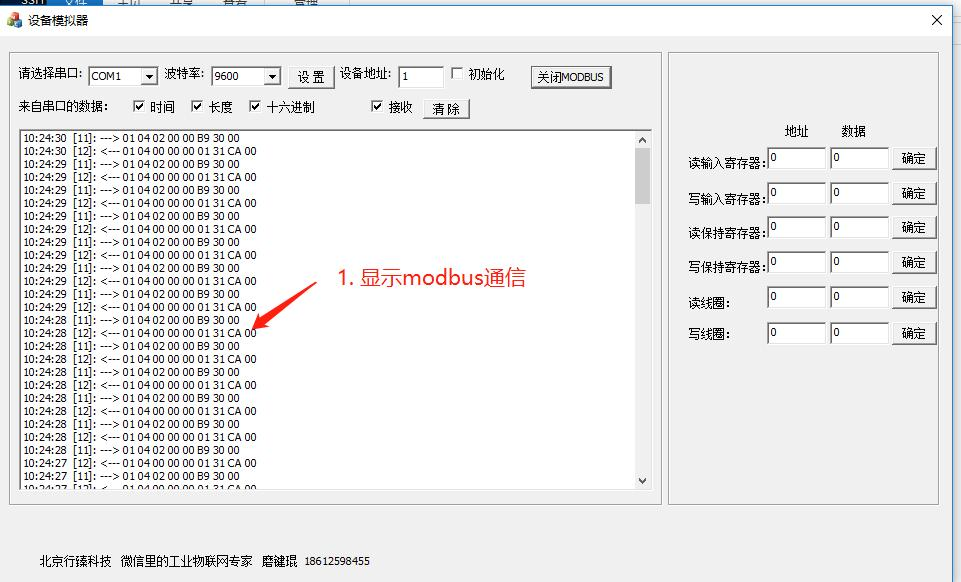
Step 6: Display modbus communication data, indicating sync completion
2.10 Bind Device
Before binding the device, please register in the official account or APP first.
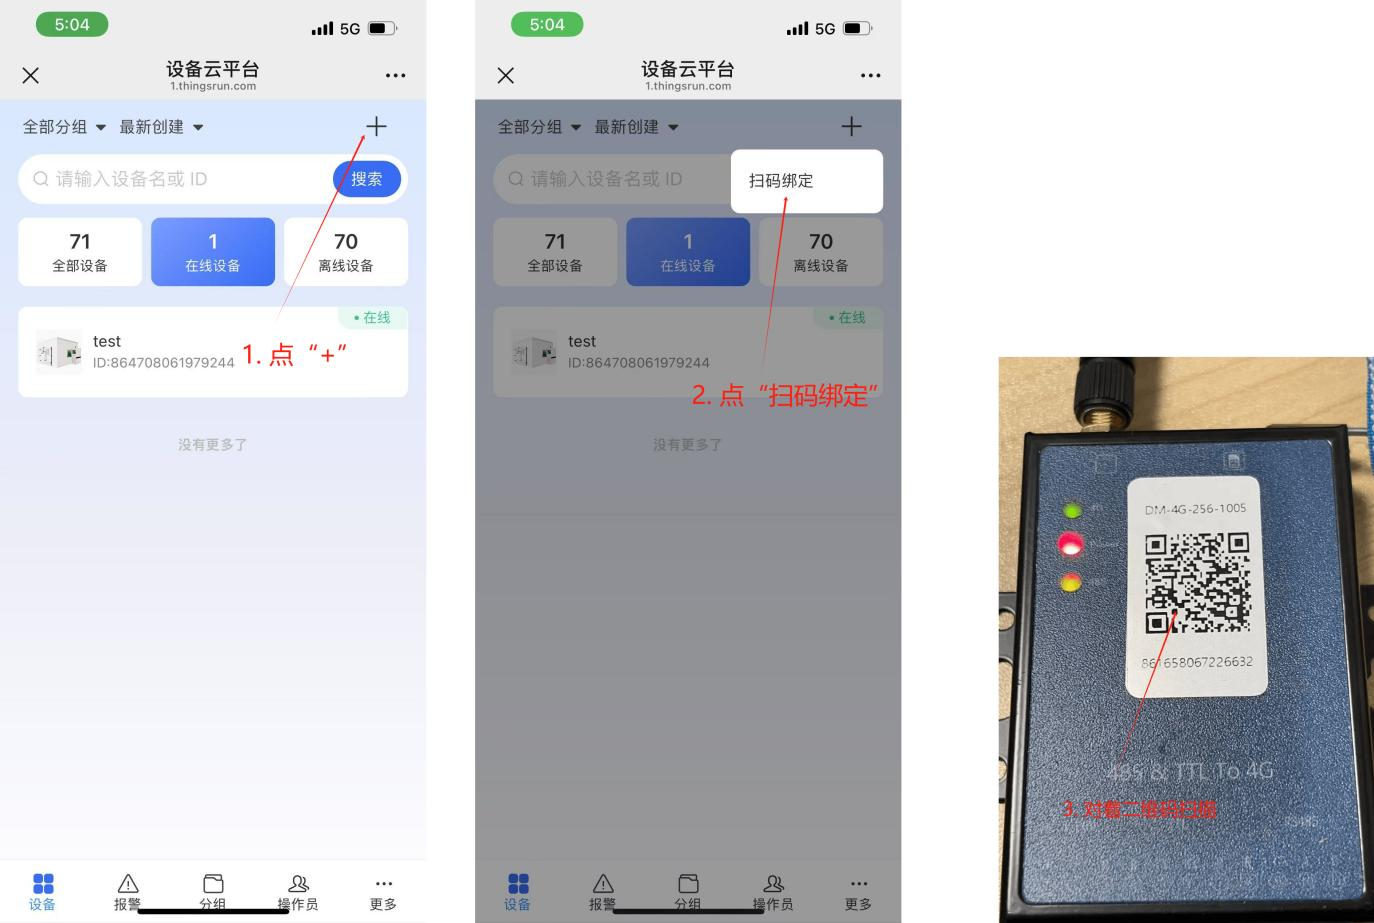
Step 1: Enter management interface, click "+" Step 2: Click "Scan and Bind" Step 3: Scan the QR code on the front of DTU
2.11 Test Verification
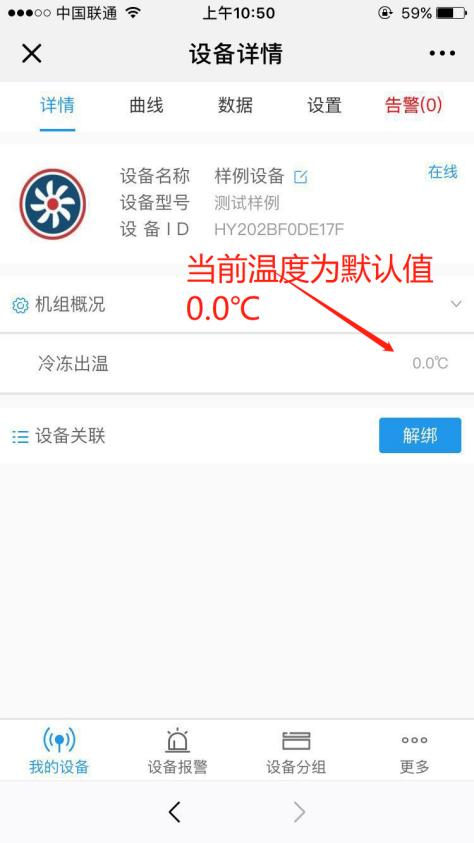
Step 1: View device details
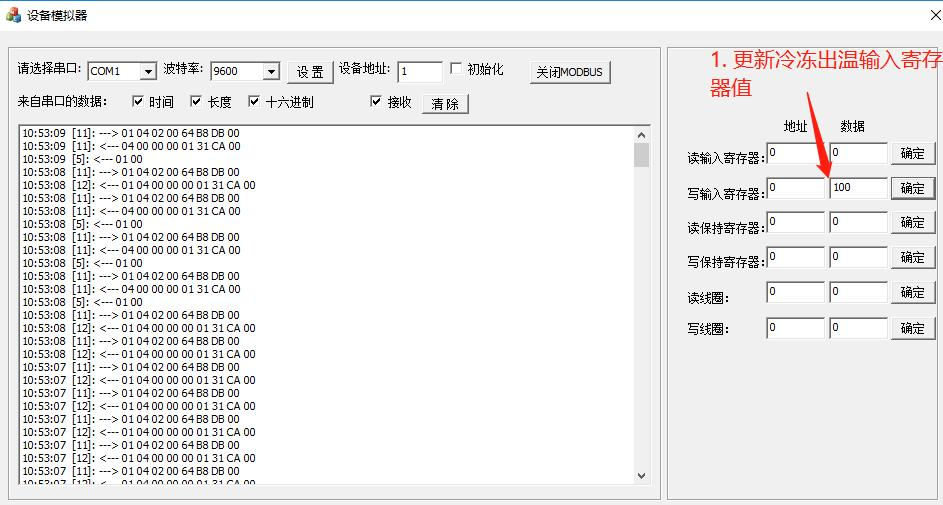
Step 2: Change cooling outlet temperature register value
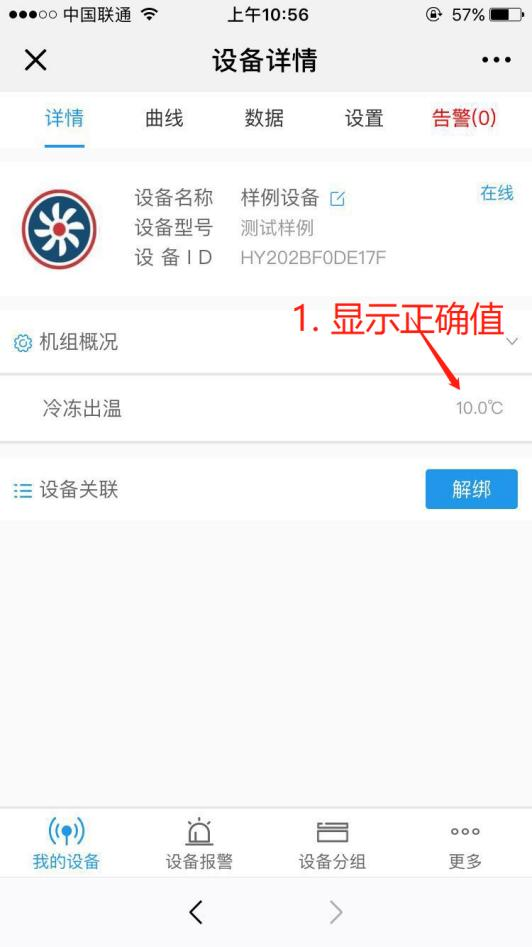
Step 3: Verify if mobile interface displays correct data
2.12 Return to Product Editing Mode
If test verification fails, you can re-edit the product. Before re-editing the product, first destroy the device created based on the product and return to product editing mode.
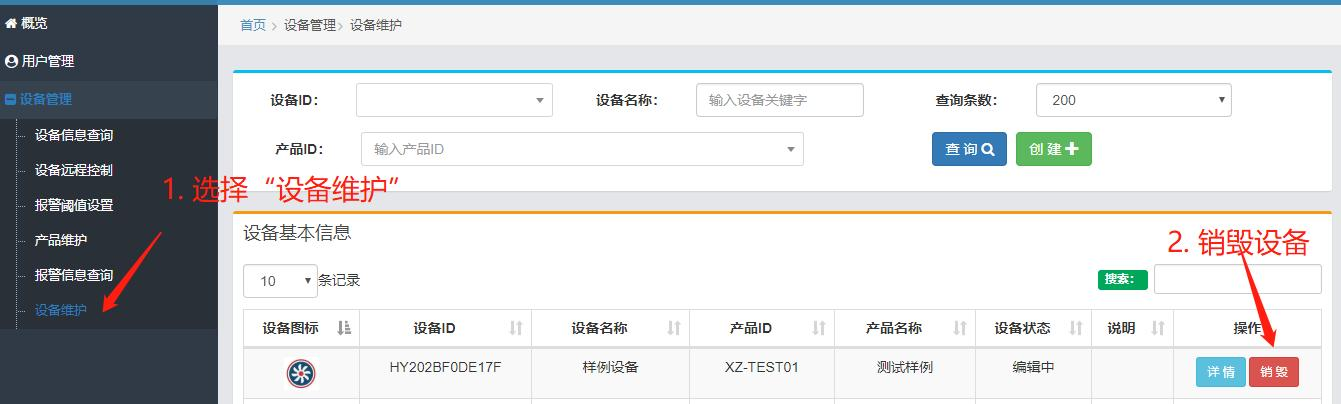
Step 1: Destroy device

Step 2: Edit device
2.13 Batch Import Parameters
In order to speed up the efficiency of adding product parameters, excel table batch import parameter function is provided. Please contact the administrator for the excel table template.
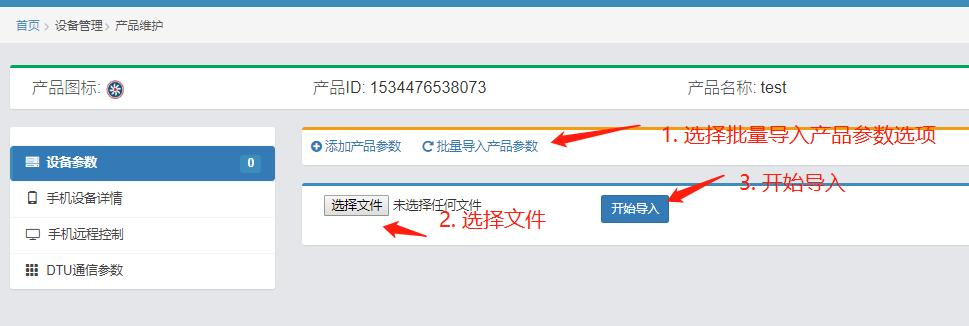
Step 1 Prepare for import
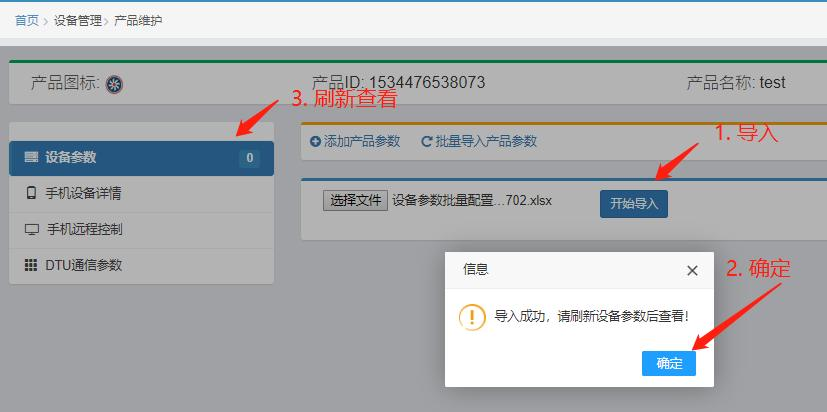
Step 2 Import and refresh
3. Configuration Controls
3.1. Mobile Device Details

3.1.1. Create New Group
Whether to display by default: Select "Yes", then enter the mobile remote control interface when the default expanded display of the group parameters select "No", then enter the mobile remote control interface when the default collapsed display of the group parameters
Create new group
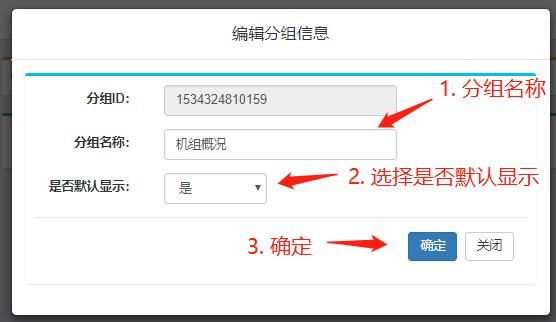
Edit group information
3.1.2. Edit Bit Indicator Control
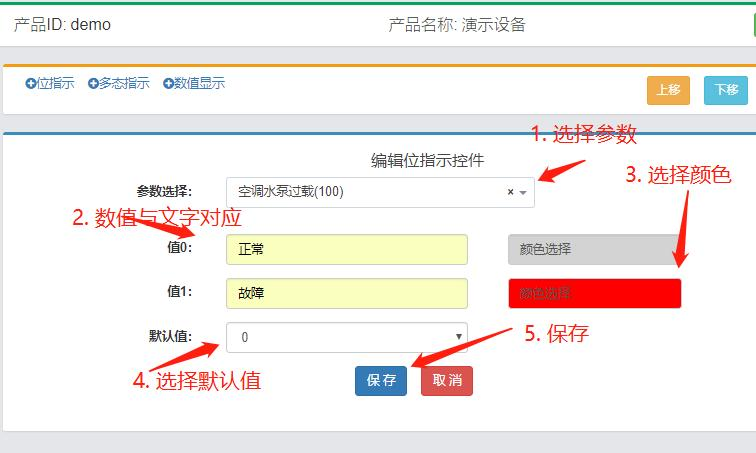
Bit indicator control
3.1.3. Edit Bit Indicator Control
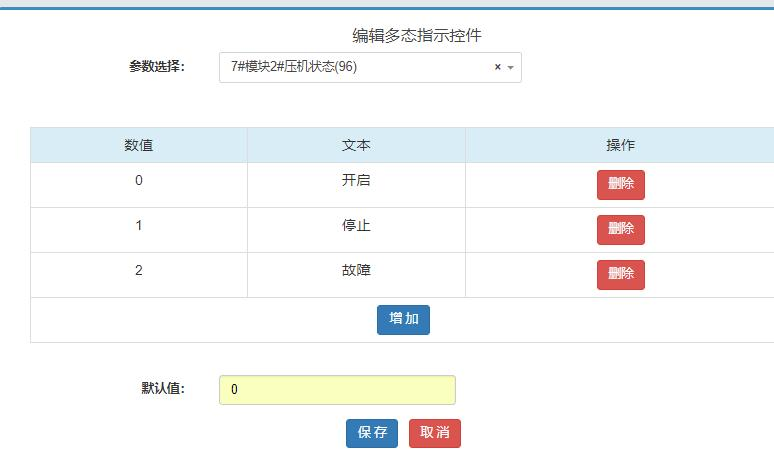
Multi-state indicator control
3.1.4. Numeric Display Control
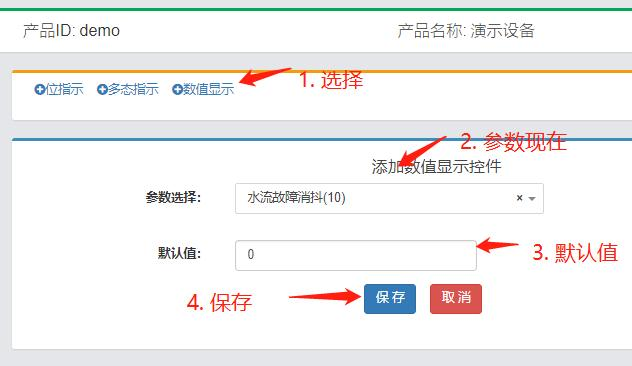
Numeric display control
Figure: Mobile device details configuration editing process
3.2. Mobile Remote Control

3.2.1. Create New Group
Whether to display by default: Select "Yes", then enter the mobile remote control interface when the default expanded display of the group parameters select "No", then enter the mobile remote control interface when the default collapsed display of the group parameters
Step 1: Add group
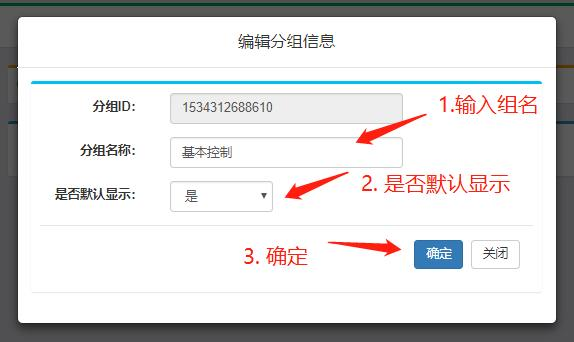
Step 2: Edit group information
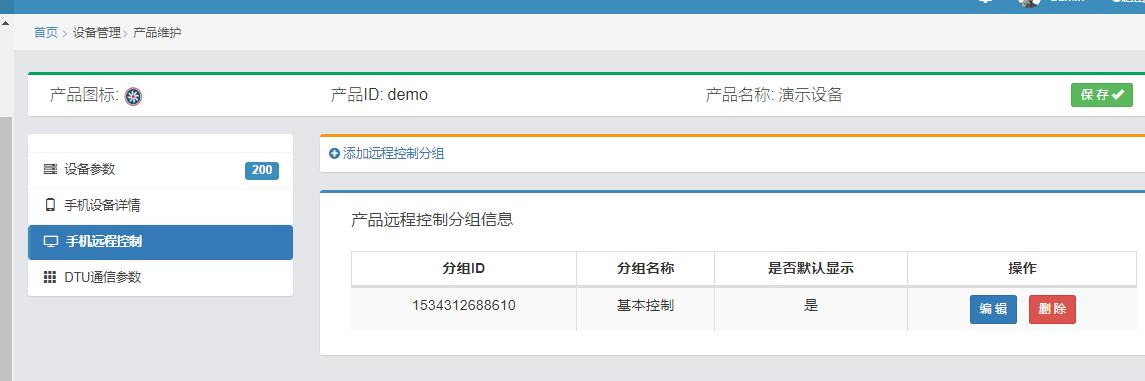
Step 3: New group created successfully
3.2.2. Add Control

Add control
3.2.3. Edit Control - Numeric Input and Display
Tip: Parameter selection can input parameter ID to improve selection efficiency
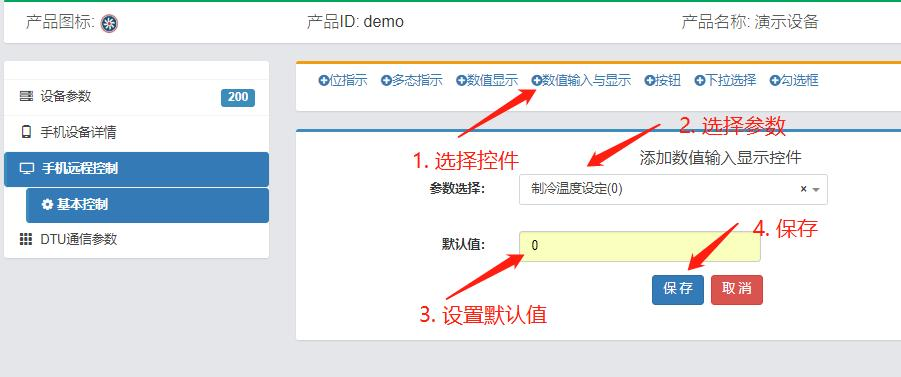
Edit numeric input and display control
3.2.4. Edit Control - Button
Buttons are divided into three types:
- Set value type When the user presses the button, a certain value is set
- Alternating type When the user presses the button, the button value is displayed and set alternately.
- Switch type Left and right pull switch button.
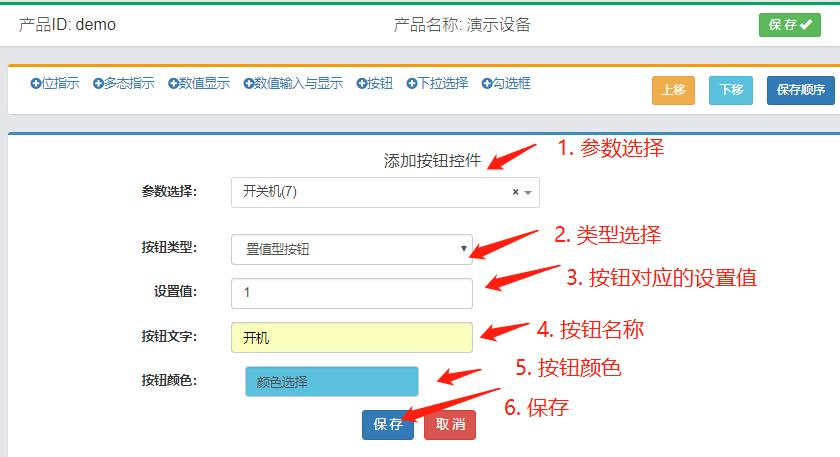
Add button - Set value type
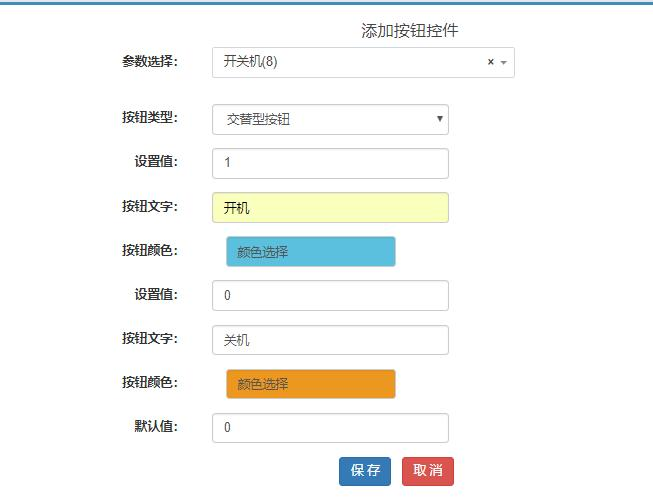
Add button - Alternating type
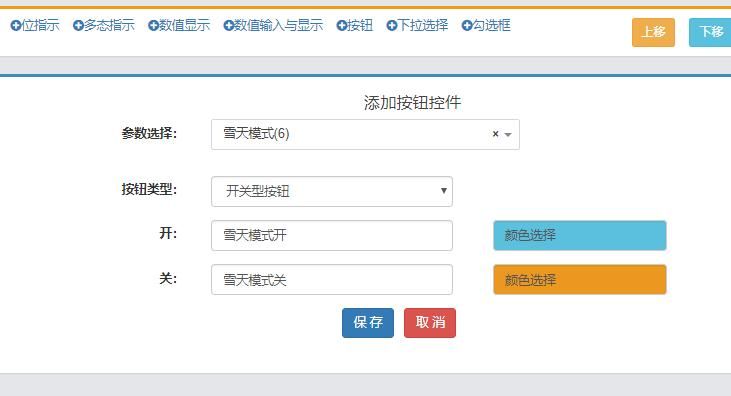
Add button - Switch type
3.2.5. Edit Control - Dropdown Selection

Add button - Dropdown selection
3.2.6. Edit Control - Checkbox
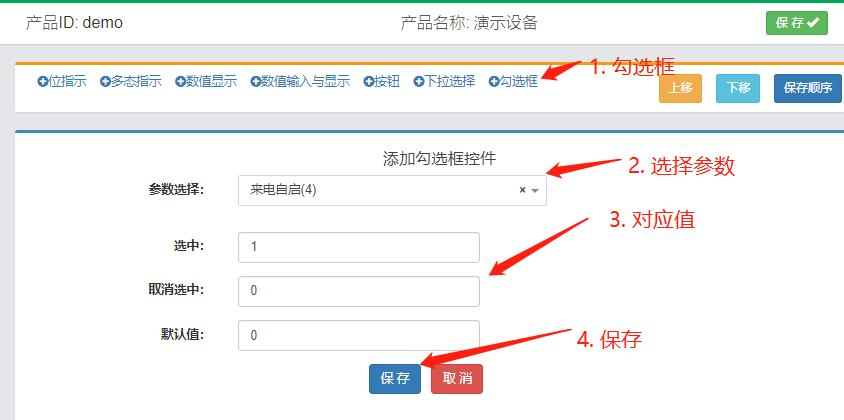
Add button - Checkbox
3.2.7. Edit Control - Adjust Order
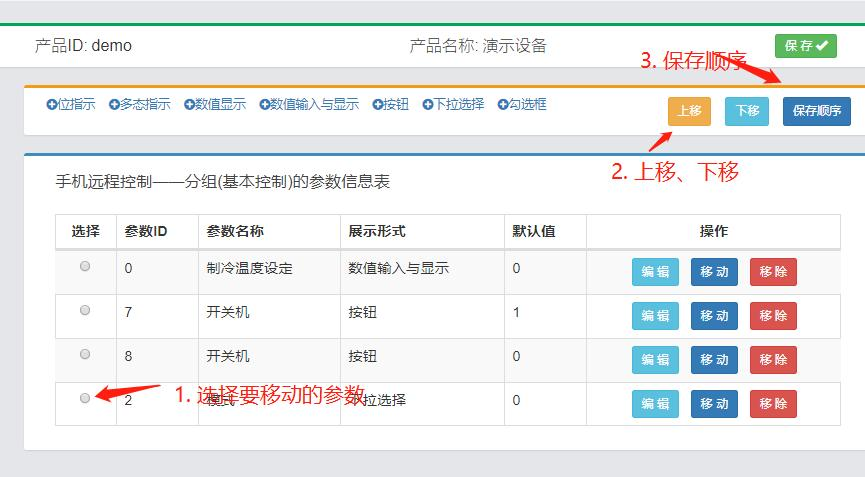
Adjust control order
4. Appendix 1 Product Parameter Configuration Rules
| No. | Name | Value | Description |
|---|---|---|---|
| 1 | Parameter Name | ||
| 2 | Parameter ID | 0~65536 numbers | Product-level unique, automatically generated by the system |
| 3 | Address Type | 0x | Read-write coil |
| 1x | Read-write discrete | ||
| 3x | Read input register | ||
| 3x_Bit | Read 1 bit of input register | ||
| 4x | Read-write holding register | ||
| 4x_Bit | Read 1 bit of holding register | ||
| 4 | Address | Default 0 | When the address type is 3x_Bit or 4x_Bit, the address type is A.B format, A represents the address number, B represents the B bit of the address, where B ranges from 0~15. |
| 5 | Length | 1~32 | Default 1, no more than 32 |
| 5 | Decimal Point | 0~4 | Default 0 |
| 6 | Reporting Mode | Timed reporting | Report at each timing time |
| Immediate reporting when changed | Report when data changes, when data does not change, report according to the reporting interval. | ||
| Report when data equals a certain value or when changed | Report when data equals a certain value, enter the value in the "Equals value" edit box | ||
| 7 | Reporting Period | 60 seconds | When the reporting mode is: "Timed reporting", "Report when data equals a certain value or when changed", the default display starts from 60 seconds When the reporting mode is "Immediate reporting when changed", the display starts from 600 seconds |
| 120 seconds | |||
| 180 seconds | |||
| 600 seconds | |||
| 660 seconds | |||
| 720 seconds | |||
| 1800 seconds | |||
| 8 | Unit | Multiple preset units are optional by default, and can also be self-recorded | |
| 9 | Data Type | Switch | Only can take values of 0, 1, address type should be: 0x, 1x, 3x_Bit, 4x_Bit |
| 16-bit integer | 16-bit integer, address type: 3x, 4x | ||
| 16-bit positive integer | 16-bit positive integer, address type: 3x, 4x | ||
| ASCII | ASCII code, address type: 3x | ||
| 10 | Read-Write Type | Read-only | All address types |
| Read-Write | 4x, 0x | ||
| Write-only | 4x, 0x | ||
| 11 | Historical Data | Display | Can display data curves, historical data; can export historical data |
| Not display | Do not display data curves, historical data; cannot export historical data | ||
| 12 | Whether to allow setting alarm threshold | Yes | Can set alarm conditions, system alarm when alarm conditions are triggered |
| No | No alarm | ||
| 13 | Alarm threshold setting | Yes | If "Whether to allow setting alarm threshold" is selected as "No", it will not be displayed, otherwise a dialog box will pop up, and alarm conditions can be edited. Single or multiple conditions can be selected. |
| No | |||
| 14 | Permission | Manufacturer | Can select parameter visible users. When unchecked, this type of user does not display this parameter |
| Dealer | |||
| End user | |||
| 15 | Remarks | Remark information |
5. Appendix 2 Configuration Development Skills
5.1. Skill 1: Make Good Use of Search Function
Skill 1: Make good use of search function 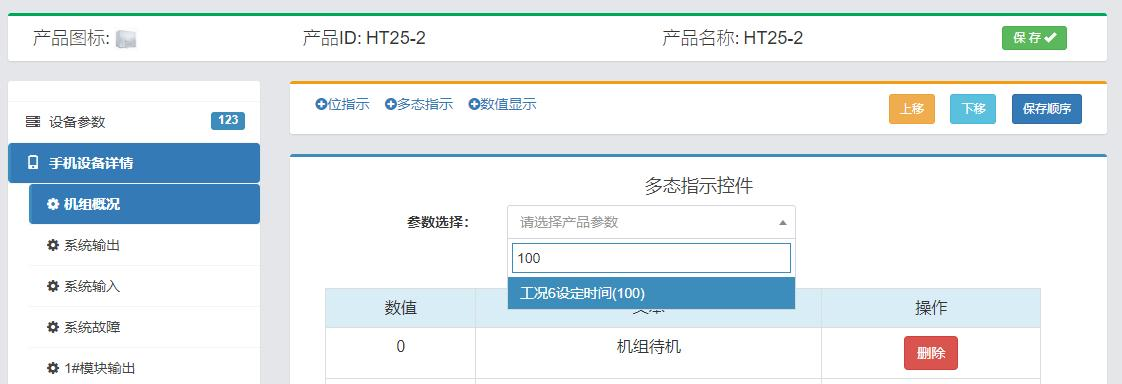
Skill 1: Make good use of search function - Search by parameter ID
Some devices have many parameters. When editing controls, searching parameters by parameter ID can quickly select them.
5.2. Skill 2: Make Good Use of Continuous Parameter IDs
When creating parameters, the system automatically generates ID numbers, these ID numbers are usually continuously increasing (if not manually changed), so search control parameters through continuous parameter IDs.
5.3. Skill 3: Make Good Use of Reporting Mode
Data reporting modes are divided into: timed reporting, immediate reporting when changed, reporting when data equals a certain value or when changed. Appropriate reporting mode can save traffic and improve user experience.
Timed reporting Used for analog quantity reporting, such as temperature, humidity, etc.
Immediate reporting when changed Used for configuration quantities or infrequently changed data reporting, such as device status, time configuration, temperature configuration, output IO status, input IO status, etc.
Report when data equals a certain value or when changed Used for fault alarm switch quantities.
5.4. Skill 4: Make Good Use of Virtual Test Function
When developing new product configuration, you can first not connect to DTU hardware, directly use the "Virtual Test" function to verify whether the data and data display are correct.
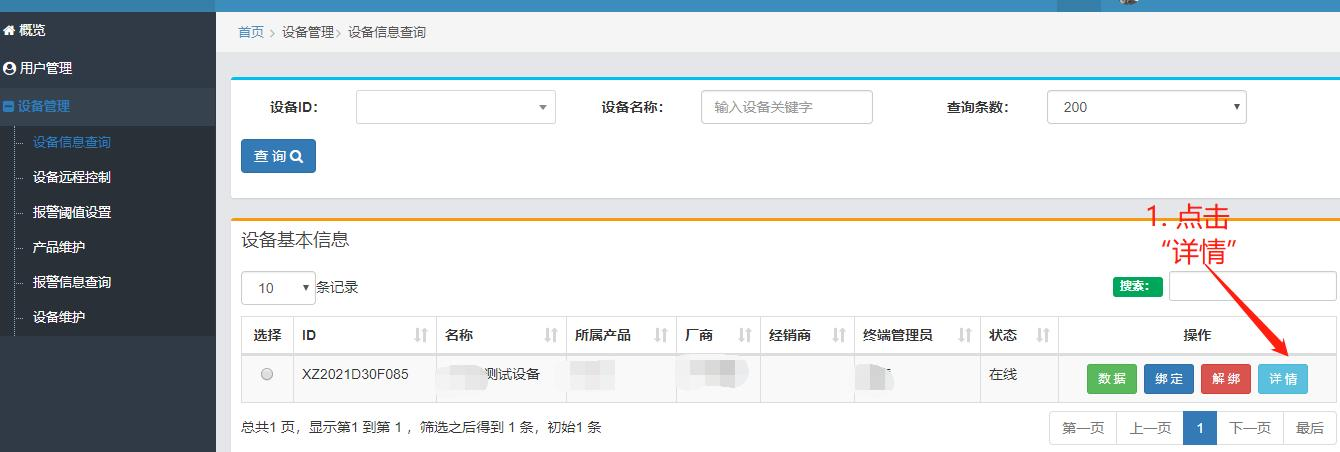
Step 1: Click "Details" in device information query

Step 2: Input data and report
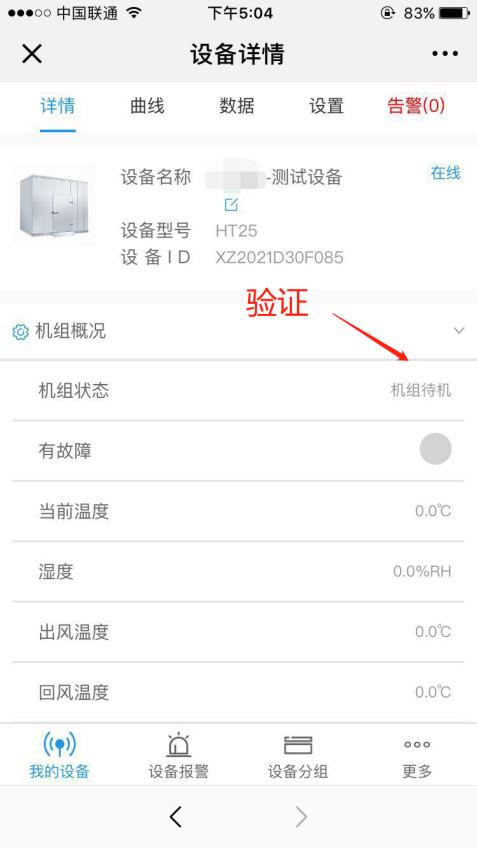
Step 3: Mobile verification
5.5. Skill 5: Quickly Check if Parameters are Configured Correctly
6. Contact Us
Company Information
- Company Name: Beijing Xingzhen Technology Co., Ltd.
- Company Address: Room 519, Building 1, No. 10 Longyu North Street, Changping District, Beijing
- R&D Center: A16-3A, Chuangxinggang Changban University Innovation Park, No. 21 Changyuan Road, Tianhe District, Guangzhou
- Contact Person: Li Zhongyou
- Phone: 15625178785 (same as WeChat)